I made a quick tutorial video for you all to help with any confusion! cardstock 1dogwoof Once this step is done, cut all your pieces! Cakes with less layers or sheet cakes may need shorter sticks. You can use wooden skewers that you can find in the grocery store or at your local craft store. Definitely consider that which you said. You need a font thats thick enough to survive the cut, is legible, and can easily interlock words, preferably at three or four different spots. Thou there are times i use slender fonts for some designs as requested by my clients. And the. I only use the Paper Studio brand for embellishing cake toppers, but not for the cake topper itsself. I made this entire cake topper using a selection ofBazzill cardstock paper andholographic paper from 12x12 Cardstock Shop.In addition to the colors being totally on point, the quality and texture of the paper is incredible. 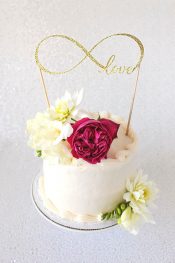 These work great for cake toppers because you can attach the letters easily and you have a solid space to glue the cake topper stick to when youre ready. Next, ungroup the words and letters to create a design thats condensed and combines the upper and lower letters in at least three places. The choices of card stock paper are endless. Next, you will reverse your cake topper so you can add hot glue to the backside of the decal before adhering the clear stick to the cardstock. Glue your small seaweed on top of your number. However, if you want to layer your topper like me, duplicate your welded backing two more times so that you have three of the same backing pieces. Cut the shape out and use it as a layer behind your image. Once youve made your cake topper, please share your creation on Instagram using the #DIYCakeandCrafts, so I can brag on your awesomeness! We also use third-party cookies that help us analyze and understand how you use this website. I tape my cake toppers to a backing board using washi tape. To weld an image in Cricut Design space, follow these 4 simple steps: An important step in preparing your design for welding is to be sure your letters and images are touching in a least two places. Check out this post about how to make custom shape shakers. Other uncategorized cookies are those that are being analyzed and have not been classified into a category as yet. topper fortnite cake byba llama cardstock using If your font is too thin, it will be difficult for the design to hold up even on thicker paper.
  I went Into font, all and typed the name but its not coming up. . These cookies will be stored in your browser only with your consent. ).
This will be the backing to your cake topper. Now that you have your letters where you want them, highlight the entire design and click attach. Im so excited to finally share my DIY cake topper tutorial! You want to glue the skewers as far up the back of the topper as you can without being visible. The foam squares were added throughout the design as seen in picture. Please try again. Cake toppers can be the difference from a boring store bought cake vs the perfect decoration to complete your creative vision for a themed party. 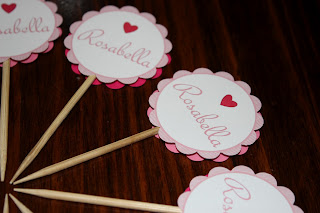 For this years Fathers Day tablescape, I used blackberries, blueberries, and thyme to decorate a plain white 7 cake from Hy-Vee and decided what the heck?! By clicking Accept All, you consent to the use of ALL the cookies. I love hearing from you guys, and Im happy to help! Then the package gets added to a hard backed large envelope for the best protection. You only need a handful of craft materials, which is super convenient considering cake toppers can be on the pricier side on Etsy! Align the rectangle to the center base of the cake topper (see above). Could you tell me the thickness of the micheals glitter card stock, im from the UK so dont have one over here and would be good to have a look around for one with the same thickness, as hobbycraft glitter card stock is so thin! Necessary cookies are absolutely essential for the website to function properly. Another option is to use clear cake topper sticks that you can find on Amazon. Question, do you use any method to clean and disinfect the side of the skewer that goes on the cake?
 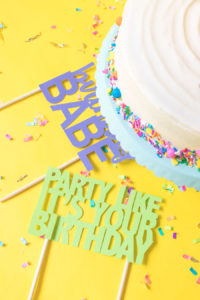 If you are free-handing the topper without design space, making those slices for where the cake stick goes will be a lot easier. Click to share on Twitter (Opens in new window), Click to share on Facebook (Opens in new window), Click to share on Pinterest (Opens in new window), You Make Everyday Brighter Free Printable Rainbow Class Valentines, Pot of Gold Saint Patricks Day Printable Favors , Quirky Script (which is a Cricut Design Space font), Type your wording using the font of your choice, and add any images you would like to include in this layer, Select the unattach tool to un-weld your images and letters. The next few steps are totally optional as you do not have to add all the extra layers like I do. Cut glitter cardstock using material settings of glitter cardstock with more pressure and the fine point blade (which is the blade included with all Cricut machines). Unsubscribe anytime and your email will never be shared. Regular non-glitter card stock is not think enough on its own to create a cake topper. Yay for making fun cake toppers with Cricut! This cookie is set by GDPR Cookie Consent plugin. However, you may visit "Cookie Settings" to provide a controlled consent. How would I go about creating the actual worded design? Creating a cake topper-friendly design is all about choosing the right font. When choosing a font, there are a couple of important factors to keep in mind: thickness and whether its legible. ReplyCancel, You can use it to adhere a cardboard backing to the glitter if you feel like the topper needs to be reinforced I only used it to attach the cardstock to the skewers since it felt durable enough to me!ReplyCancel, What size bamboo skewers do you use?ReplyCancel, Standard BBQ skewers work great I think mine were 11.25 long and 3mm wide, but you can cut them down to your desired length!ReplyCancel, Thanks for the tutorial! If you are creating your own designs, I recommend adding a stroke to the lettering or underscoring slenderfonts with a thick line to make sure that the toppers can hold their rigid shape. I know I kind of glazed over the design part, so please let me know if you have any questions or concerns about this Fathers Day cake topper tutorial (or any of my others). Thank you for all the tips.
 .jpg) I already had one of those & grabbed the others from Creative Fabrica. cricut box cake cards philosophy cardstock card 3d paper crafts exploding cartridge using boxes projects diy cakes craft cut templates Try to pick a thicker font like Homeday or Sugar and Spice. I love your work!ReplyCancel, Thank you so much! I have an Air Pro and not a Maker so Im not exactly sure but I think as long as the thickness of the two pieces of material doesnt exceed the Makers depth settings, you should be able to cut them together! Do you double side the topper? Once youre done arranging the letters, attach, weld, and resize the design to fit the diameter of the cake. Your cake topper is done! We use cookies on our website to give you the most relevant experience by remembering your preferences and repeat visits. Where to find FREE fonts for the perfect cake topper design. Welding the letters together keeps the whole word connected during cutting and makes for easy placement on the cake topper design instead of placing each letter separately for non-connected fonts. I have a Cricut Maker, however, you can also use other type Cricut cutters like the Cricut Air for this project. Trim two wooden skewers to fit the height of the cake and then hot glue them to the back of the topper. The cookie is set by the GDPR Cookie Consent plugin and is used to store whether or not user has consented to the use of cookies. It ensures that your cake topper is sturdy and will stand upright. Anyway, lets get started with this DIY tutorial. Cricut. You can do different color variations for your cake topper, based on your preference.
I already had one of those & grabbed the others from Creative Fabrica. cricut box cake cards philosophy cardstock card 3d paper crafts exploding cartridge using boxes projects diy cakes craft cut templates Try to pick a thicker font like Homeday or Sugar and Spice. I love your work!ReplyCancel, Thank you so much! I have an Air Pro and not a Maker so Im not exactly sure but I think as long as the thickness of the two pieces of material doesnt exceed the Makers depth settings, you should be able to cut them together! Do you double side the topper? Once youre done arranging the letters, attach, weld, and resize the design to fit the diameter of the cake. Your cake topper is done! We use cookies on our website to give you the most relevant experience by remembering your preferences and repeat visits. Where to find FREE fonts for the perfect cake topper design. Welding the letters together keeps the whole word connected during cutting and makes for easy placement on the cake topper design instead of placing each letter separately for non-connected fonts. I have a Cricut Maker, however, you can also use other type Cricut cutters like the Cricut Air for this project. Trim two wooden skewers to fit the height of the cake and then hot glue them to the back of the topper. The cookie is set by the GDPR Cookie Consent plugin and is used to store whether or not user has consented to the use of cookies. It ensures that your cake topper is sturdy and will stand upright. Anyway, lets get started with this DIY tutorial. Cricut. You can do different color variations for your cake topper, based on your preference.
These cookies track visitors across websites and collect information to provide customized ads. Hello, thank you for sharing your tips and tricks on cake toppers! I used Cricut Design Space for my images but you can use any images available to you. Now that you have your cake topper just like you want it, place your card stock on the GREEN Standard Grip Cutting Mat and load it into your Cricut. Ive been wanting to get into more Cricut cardstock projects lately anyway, so I played around in Cricut Design Space and came up with something that worked perfectly.
Once youve chosen a font, type the text (Happy Fathers Day, Happy Birthday, Mr and Mrs so-and-so, etc) and adjust the line height so that the words are practically right on top of each other. So glad this information is helpful for you! Performance cookies are used to understand and analyze the key performance indexes of the website which helps in delivering a better user experience for the visitors. Thank you for your submission! Lollipop/Cake Pop sticks are Ashleighs favorite.  I cannot believe that it has been over 7 months of 2019! One advantage of using wooden skewers is that you can trim them to size according to your cake design. Thicker cardstock helps make cake toppers made with Cricut sturdy, however, small details are easier to cut with thinner paper. Thank you for sharing! This increase the integrity and sturdiness of your cake topper. In this tutorial, I am going to show you how to make a DIY cake topper with your Cricut cutting machine. First, lets talk about card stock paper. Once you have your custom .png, you can follow the rest of the tutorial to upload to DesignSpace. Hobby lobby has a similar brand called Paper Studio, but the weight is slightly lighter. They have sunlight all day long, for part of the year that is. Thanks!ReplyCancel, I created all of the topper designs using InDesign! A glue gun with a small tip is helpful to control the amount of glue and not flood your DIY cake topper with gobs of glue. Next, trim two wooden skewers to fit the height of the cake and then hot glue them to the back of the topper. Sign up for secret sales, new product alerts and more. Use adhesive foam in between layers to create dimension for your cake topper. Another option for cake topper sticks are acrylic lollipop sticks. The best fonts for making cake toppers with Cricut have thick letters with clean edges for easy cutting. Unlock the dimensions and make the square a long, thin rectangle.
The foam adhesive comes in squares but for this project, I cut the square in half to conceal the foam behind the design. I do wish we had more time in the day, more sunlight that is! Luckily, lollipop sticks can be trimmed easily with scissors. Kind of like Alaska!? You will be included in my email newsletter with helpful Cricut ideas, tips and resources. I do this because 1) it adds durability and depth to the topper, and 2) its a nice way to conceal the cake stick. Both the Cricut Explore Air 2 and the Cricut Maker models have a max cut size of 11.5 by 11.5 inches.  Then I add the board with cake topper to clear sleeve storage bags.
 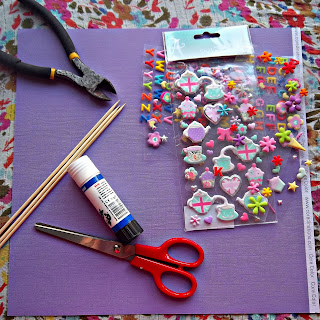 Please read myfull disclosure for more information. 2017 DIY Cake & Crafts. If you find this a bit confusing, go to my Instagram account @Pineandpartyco and go to my 12x12 tab. And the Cricut Explore Air 3 and Maker 3 can cut 11.7 inches by 12 feet with smart materials like smart Paper Sticker Cardstock. You can definitely add more but dont go overboard. We use cookies to ensure that we give you the best experience on our website. I would do a test run with scrap pieces just to be sure!ReplyCancel, I was also wondering about the same thing. Craftara Creates 2022. This website uses cookies to improve your experience while you navigate through the website. Clear cake topper sticks are pretty cheap and you can buy them in packs of 50-100. Press the flashing C and let your Cricuit do its magic. jennifermaker
To help fortify the cardstock and avoid a total glitter explosion, layer parchment paper on top of newspaper (or your garage floor or whatever) and spray the topper with adhesive spray.  They are the KingSeal Natural Bamboo Wood Skewers. Cricut cardstock projects are some of my all-time favorites. This will allow you to rearrange each independently, Arrange the images and letters so each are slightly overlapping, Click the weld tool to weld the objects into a single layer. You can also use other brand electronic cutting machines. I am obsessed with fonts & waste too much time choosing them for my projects so having a list of fonts was perfect for me. The cookie is used to store the user consent for the cookies in the category "Other. Use foam adhesive between each layer. The brand and thickness (aka weight) depends on the theme and design. Keep reading for a step-by-step tutorial on how to make a cake topper from start to finish! By the way, I like the infinity love and celebrate design.ReplyCancel, Did you use the modge podge for the cardboard backing and the glitter cardstock? The cookie is set by GDPR cookie consent to record the user consent for the cookies in the category "Functional".
  The final step in creating the perfect cake topper is to use hot glue to apply the Hobby Lobby skewer to your Recollections glitter card stock cake topper. As an Amazon Associate and member of other affiliate programs, I earn from qualifying purchases. You managed to hit the nail upon the highest as neatly as outlined out the whole thing with no need side-effects , other people could take a signal. I used some of my favorite script and sans serif fonts to create custom topper designs that can be found at the bottom of the post to download and use for your own cakes! Do those fonts come in the Cricut DesignSpace App? The thickness of a font is key. Its also important to make sure that all dots above letters, such as is and apostrophes are, sliced and reattached by welding. Next, assemble your octopus, seahorse, and number. Choosing the right paper makes a difference in the quality of the personalized cake topper. However, its important to note that you want to have a heavy card stock paper to make a cake topper. You want to glue the skewers as far up the back of the topper as you can without being visible.
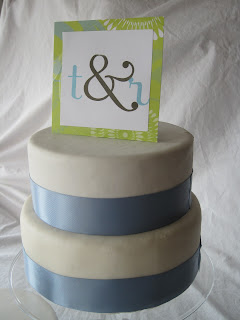
It was fun incorporating more blues and gender-neutral tones into my table settings for a change. Cricut Project: Etched Monogram Champagne Flutes, Easy Fall Cricut Project: DIY Pumpkin Ice Bucket, How to Make Your Own Wedding Welcome Sign. These would also work well to make matching drink stirs too. I had a lot of fun creating these designs for a chic and modern weddingcake topper! You wanna know what was missing? Advertisement cookies are used to provide visitors with relevant ads and marketing campaigns. It does not store any personal data. Once your Cricuts done cutting, carefully weed out your design, making sure to be extra careful around the frills. Required fields are marked *. What is welding? I would love to see them. Here are a few fonts that work well for cake toppers. I would recommend using a design program of some kind to create your custom topper, then exporting it as a .png. I have actually attempted it multiple times but something was always missing.  I am using two different cardstocks, one is regular 80lb cardstock from Joanns. This was SUPER helpful!! If Im selling a cake topper, I always go the extra mile and spray paint the top part of the skewer to match the glitter card stock. Im looking to create a customized cake topper for a friend on the Cricut at my local library. The cookies is used to store the user consent for the cookies in the category "Necessary". I like to use layered svg files so that I can build up the images for a cool 3D effect but there are ways to achieve that without a layered file. A sturdy card stock is the best choice to use when making cake toppers. I like to layer x4 backing pieces behind my cake topper. Creating personalized cake toppers with Cricut is a fun and easy craft to get started with your machine. There are several options for cake topper sticks that you can use for this project. Analytical cookies are used to understand how visitors interact with the website. Glue with a precision tip and double sided adhesive foam. I used my scissors to cut off the circle part so it could adhere better to the pink cardstock. Your favourite reason seemed to be on the web the easiest thing to bear in mind of. Lastly, customize the topper with a name and voila! This post was sponsored by CRICUT, a Hey Wedding Lady Partner. Your email address will not be published. I find it really hard to line up perfectly, so single-sided is a much cleaner look. Adhesive foam sheets, acetate and chunky glitter. Absolutely gorgeous project! Please share your creations on Instagram using the hashtag #sprinkledwithpaper. Welding the letters together will cut the letters together as one solid image. I always use Michaels Recollections brand glitter card stock for all of my cake toppers. Optional. Why not try and make my own DIY cake topper for a change? toppers y3w backed cardstock Welding creates a single layer of images and letters in Cricut Design Space, allowing the cake topper to be cut in one continuous piece.
You need a font thats thick enough to survive the cut, is legible, and can easily interlock words, preferably at three or four different spots. Cake decorating has become somewhat of a surprising hobby for me lately! toppers cupcake cardstock plain dark simple heart pink name light Reverse tweezers act as like an extension of your fingers and make placing small paper cuts more precise. Dont forget to share your finished product with me and tag Modern Flower Creation! A lightly used StrongGrip Mat. Have you tried it already?ReplyCancel, In my own opinion, I think using a calligraphy strong font is much better than the slender font. Use a small amount of pressure and hold it in place until the glue is set. Do you only work with cricut? Thanks I wrote about how to earn small amount of free bitcoins here: https://bit.ly/FreeBTCWay, I cant find the October twilight font. Using solid core paper is important with rolled paper flowers because the white becomes visible along the edges. Because gold glitter cardstock is thicker than normal cardstock (Im not sure if its the glitter or what), set the material to Poster Board and cut the design. I would recommend adding 2-3 layers behind each image so it pops out. Plus, there is no worry of it falling off when on the cake!
Im a font addict so there are a few in here I used November Starlight for a fun script look, Denver for the clean serif style, and Amigirl for the more elegant script!ReplyCancel, 2022 Hey Wedding Lady|ProPhoto WordPress Blog. I love using glitter card stock paper when I make a DIY cake topper. Heres all you need to make your own DIY cake topper-.  Time flew!
Im ready to make some cake toppers now!! Beautiful work that you do, congratulations. However, all opinions and designs are my own. I cannot wait to see your cake toppers using this tutorial! Lastly, you can use paper straws which can be easily trimmed to size and glued to the back of your cake topper. good quality paper glue with a precision tip. The glitter cardstock offers a good base for a free standing topper, but adding poster board backing ensures a firmer and longer lasting design!
). One of the best things about this cardstock Cricut project? Required fields are marked *. Weld the duplicated cake topper so its one solid cut. Comment * document.getElementById("comment").setAttribute( "id", "a974307575a1a81cc7608d187b76f786" );document.getElementById("f2b973ac17").setAttribute( "id", "comment" ); Your email address will not be published. Also consider the height of your cake topper and if you want the stick to be fully hidden it the cake or some of it showing. If you are using Design Space, arrange your images as you will want to assemble them on your canvas. Alternatively, use a green StandardGrip mat and tape down all the edges with painters tape. Join the Craftara family to gain access to myresource libraryfull of free SVG cut files compatible with Cricut. Save my name, email, and website in this browser for the next time I comment. I'm always dreaming up a new fun cake and craft projects. Having a sharp blade will ensure you have the perfect cut for your cake topper. Youll note on the outside of this card stock, the label shows what the weight of the card stock paper is. Not only is it extra thick, it adds that extra sparkly pop that every good cake topper needs, especially for holiday occassions. Use glue or 3D foam to attach a couple bubbles on the topper. Having the letters touch will make the entire cake topper more stable. Choosing the right font for your cake topper is super important. The cookie is used to store the user consent for the cookies in the category "Analytics". I hope that helps!ReplyCancel, What fonts are you using? I try to review all email submissions in 2-3 weeks - I will be in touch soon! How to Make Epoxy Resin (Glitter) Tumbler Cups, How to HYDRO DIP Gator Skin Tumbler (with Hydro Dip Film), 11 FUN Virtual Birthday Party Ideas for Kids, How to Make a (DIY) Cake Topper with your Cricut, How to make an Easy Valentines Day Gift (for Kids), Quick Guide to Starting Subscriptionand Kit Boxes, DIY Cake and Crafts Free Resource Library. The Cricut Joy will be more challenging due to the cut size limitation of 4.5 inches wide. Because gold glitter cardstock is thicker than normal cardstock (Im not sure if its the glitter or what), set the material to Poster Board and cut the design. For a long time I was not convinced a brayer was necessary, and then I got one. And thats it making your own glitter cake toppers is super duper easy! They make the perfect cake topper sticks! You also have the option to opt-out of these cookies. The trick to getting this whole design to stick together is to use the weld feature on your Cricut.  If your submission is accepted, I will ask for the full credit list for all contributing professionals, including web addresses and Instagram handles! Another option is a good quality paper glue with a precision tip.
 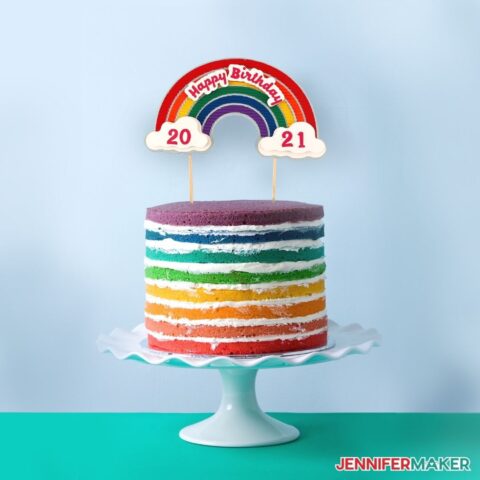 Take a look around. You may want to un-group the letters to move them up or down so they strategically touch together. I just use painters tape to cover the bottom portion of the stick (which will be placed into the cake) and spray paint the top. Once youve chosen a font, type the text (Happy Fathers Day, Happy Birthday, Mr and Mrs so-and-so, etc) and adjust the line height so that the words are practically right on top of each other. If you're looking for easy Cricut cardstock projects, this DIY cake topper is for you! Cardstock. Unsubscribe anytime and your email will never be shared. Reverse tweezers act as like an extension of your fingers and make placing small paper cuts more precise. I hope this tutorial on How to make a DIY cake topper with your Cricut was helpful to you. I say to you, I certainly get annoyed while other people think about concerns that they just dont recognise about.
  Your email address will not be published.
  Thick fonts. Adhere the clear stick to the hot glue on the back of the design.
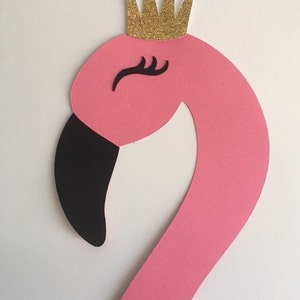
  Once your Cricuts done cutting, carefully weed out your design, making sure to be extra careful around the frills. Attach your assembled characters on top of your seaweed using more 3D foam adhesive. This cookie is set by GDPR Cookie Consent plugin. Well, good luck creating your cake toppers! Next, you will adhere the glitter cardstock to the pink cardstock. The offset feature is now available on both the desktop and mobile app version of Cricut Design Space. So follow along with me and let's get creative together! Before you go, can I ask a little favor? twinkle Paper tends to dull the blades quickly. For the spray paint, I use Krylons Gold Leaf metallic spray paint. Card stock paper comes in different weights and it also comes in different textures or glitter card stock paper. Hot glue dries quicker and adds more stability to the skewer and topper than regular craft glue. The colors were always off! Thin fonts are more likely to rip and make the overall cake topper more flimsy. cupcake toppers wrappers own cupcakes cake topper birthday organize cute One thing to note is that for extra adhesive ability, I added hot glue to the foam squares. Tips for welding your design in Cricut Design Space and also which supplies create the best cake toppers. Blue LightGrip Mat: light/thin cardstock, printer paper, construction paper, Green StandardGrip Mat: medium cardstock, textured paper, patterned paper, Purple StrongGrip Mat: Thick cardstock, Glitter cardstock. The disadvantage is using more materials when the back of the cake topper may not be seen at all. Clickhereto learn more about me. Pumpkin Spice Macarons with Pumpkin Ganache Filling, HOW TO MAKE SANDWICH BREAD AT HOME (EASILY), How to Make THE PERFECT Cheesecake (That Doesnt Crack).
The advantage of using clear cake topper sticks is that its clear and you dont risk getting wood splinters from the skewers in your cake. Use left/right arrows to navigate the slideshow or swipe left/right if using a mobile device, How to Make A Paper Cake Topper Like An Expert, choosing a selection results in a full page refresh, press the space key then arrow keys to make a selection.