In answer to how far apart the nails are, we were nailing into the wood floor joists so every 18". If that didn't answer your question, just let me know again. 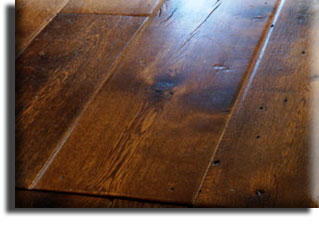 Never glue the last rows to the subfloor, as this prevents the hardwood floor from expanding. the picture does look good on those wide planks.
  How do you install nail face on hardwood floors? For this reason, wood flooring has a tendency to expand mainly in the direction the tongue is facing. Why You Shouldnt Nail Nailing laminate planks down will cause damage that will not only make the floor useless, but also void your warranty.
and the floors' beginning to look neat. Dara, Thanks for the post, I am having a hard time finding the flooring, at Lowe's they have a "whiteboard" pine 1" by 10" by 12" for like 20$, is this pine like the #3 grade ponderosa?? 
 Readers ask: Will Japanese beetles kill rose bushes? (Extremely wide boards 8 to 12 inches wide require three nails instead, and boards under 4 inches use one nail.).
 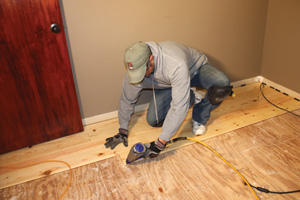 SANGI, : , , 62,4% Covid-19, , EMA: , : Summer school on natural drug products. Use 2 cleats, 1-2 from the board ends, and 4-6 apart with a minimum 4 cleats per piece. Aspirin Express icroctive, success story NUTRAMINS.
  Your installer will determine what type of use, and how it will be applied either in a zig-zag or railroad ties. And we will be doing it again in other rooms as soon as we can. You can also install antique cut nails in heart pine flooring but it will require pre-drilling prior to installing the antique cut nails.
This gave a nice v-groove accent between the boards. Product can be installed above-grade or on-grade level on a wood-based subfloor.

 anyway, we recently ripped out the carpet in the sunroom since the PO had 4 cats and a dog and the smell remained even after 2 doses of carpet shampooing. Your installer will determine which type of nail gun and nail/staple, and their size as part of the installation process.
  We let them sit in the room for about two weeks to acclimate to the house. Countersink nails by hammering them below the surface of the wood. To run parallel to the floor joists, you must add a layer of 1/2 plywood underlayment or brace every 16 between the joists with a nominal 2 x 6 spf nailed in place. Glue the groove; insert the spline and fasten the piece with the floor nailer. Please note, comments must be approved before they are published. i initially thought of putting just plywood but Lowes had a deal on fir floor planks. This way the nails didn't blow through into the basement ceiling below. Avoid taping to the finished flooring, as it may react and weaken the finish. After each board was cut to size, wesanded a small bevel on the top two long edges. No, it was not easy, but it was totally do-able if you have some experience. That sounds like a very cool project!
So I see no reason not to do it. I also have #3 1x12x14 long planks with slight water damage I got for $1/square foot.
And painting-over is not normally recommended. Starting along the longest wall or the wall to which you want your flooring to run parallel, push 1/4-inch spacers against the wall edge every few feet. We pre-drilled the holes through the boards and then nailed through into the subfloor. Look them up on this site under the suppliers. This will allow for movement in the boards with settling and expansion.
Since the tongues on either side of the room face different ways, the floor will still expand the same amount, but instead of all the growth focusing on one side, half will go to the opposite side. Thanks so much Daraka! I didn't get a shot of the glue itself, but you get the idea. Daraka, you have no idea how timely these instructions are! I love this Dara!! If you want to face-nail the entire floor, drill pilot holes and use two nails side-by-side every 8 to 16 inches across the length, sinking into the floor joists wherever present. FAQ: What is ironic about Billy Boy death. Although the cardboard may prevent damage to the surface, it will attract and hold moisture on the floor, causing the boards to cup and crack. This method is derived from the earliest homes in the country where eastern white pine flooring boards, sometimes 40+ wide were installed.
Some popular glue down adhesives includes Bostiks Best, Mapei, Loba-Wakol, and Sika. the subfloor is plywood over rough pine planks. ', . I think it looks nice. You'll have to send me pictures when you're done. and he did suggest i use the nailer when he came to pick up his daughter yesterday. This installation methodcan also involve more equipment and creative carpentry to set and keep the boards in place while they set up in the glue.  It's all up to what looks good to you. Using empty flooring boxes is not acceptable. In rooms wider than 20 ft., this one-directional movement can cause a problem on the side of the room in which the flooring expands.
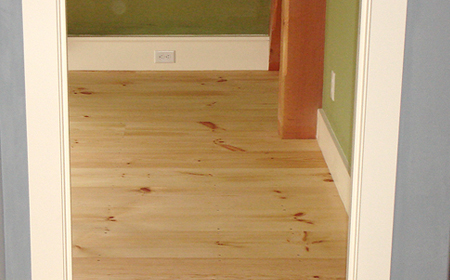
  See how we sanded, stained, and finished the floor at DIY Wide Plank Pine Floors [Part 2- Finishing]. Review of What We Think of our Wide Pine Floors, http://www.hardwoodfloorsmag.com/installation/wood-floor-cupping-why-does-it-happen-amp-what-can-you-do.html, Dream. We ended up using our car's tire jack, braced against a board that was solidly screwed into the subfloor, to gently close the gap before we nailed the board into place. and 1 in. We checked for knots that went all the way through, edges that weren't perfect, discoloration, warping, and bowing. In the photo below, it would be the board on the right. i finally decided to hide the nails and nail the wood floor with a pneumatic nailer.
We used Liquid Nails for subfloors to basically glue the ends of the two boards together, so they will move together with expansion and prevent cupping on the ends. Watch our YouTube Video on this topic: https://www.youtube.com/watch?v=YUYGiaV-PlM 5. You can use this method for pine, hardwood or reclaimed flooring if your floor was made with a tongue and groove edge, as seen below: This allows you to blind nail the boards through the tongue and apply beads of glue to the back of the boards.  If you prefer to stay with regular nails, you'll want to cover them so they don't show. The use of spline allows you to start wherever you choose. Hi Christina!
DIY Modern Rustic Cabin Bathroom Renovation Update A Gathered Vintage Spring | Spring Home Love Tour, DIY Wide Plank Pine Floors [Part 1- Installation], DIY Painted Sparrow Chargers for a Spring Table, How to Make a Wood Dough Bowl Planter Centerpiece, How to Create a Faux Concrete Paint Finish. Your email address will not be published. They may be face-nailed, glued down, "secret-nailed" (sometimes called blind-nailed -- this involves nailing through the tongue at an angle, often referred to as toenailing in other applications but secret or hidden with flooring since the nails are thereafter hidden) or even floating -- using the interlocking tongue-and-groove system to hold the floor in place. I would suggest not doing more than 3-4 rows worth of gluing to avoid the glue drying prematurely and it reduces the risk of tracking glue on the floor. Hi Mimi, thanks so much for stopping by. A few times we ended up with a board that wasn't lining up well with the previous board, leaving a wider gap than we wanted at one end. Can you face nail tongue and groove flooring? It all came together beautifully, and thankfully square to the last board! I haven't had time to write the follow up post but I will be happy to email you everything we did.
Enter your e-mail address to sign up for our Newsletter.
You can use a full spread of solid or engineered wood flooring. The only time you must face nail is if your floor was made with a shiplap or square edge. To install a face-nailed floor, lay out the floor as you normally would. Talk to a specialist about finish options. What is the purpose of countersinking nails in a wood floor?  Allow 3/4 on the width and 1/4 on the length for expansion.
We used 1/2" thick blocks of wood as spacers between the boards and the walls. Once you understand the basics of the technique, you'll find many things surrounding you, other than your floor, are face-nailed too. Mark each defect with a piece of blue tape.
by therapist Wed Apr 26, 2006 4:37 pm, Post The simplest way to visualize this process is to picture a paint being applied to a wall, as the glue is applied to the subfloor before the boards are set in place. After installation, use an approved protective cover to protect the floor. , 210 2829552.
How to Place Variable-Width Wood Flooring, How to Lay Hardwood Flooring Going Two Ways, How to Install Hardwood Floors Without a Pneumatic Stapler, Wizard of Wood: Install Nail-Down Solid Wood Flooring -- Laying the Wood Floor, Hardwood Installer: Installing Solid Hardwood Floors. Remove your backer board. The installation method recommended is not a full glue down installation, but only a bead of glue across the width of the board. This post is getting so long, I figured I would break it up into two posts. The next time I see him I've got to remember to ask him where these boards came from because everything in this house has a story. Living Room Renovation | One Room Challenge | Wide Plank Floors, Living Room Renovation | One Room Challenge | More DIY Wide Plank Floors, Living Room Renovation | One Room Challenge | Week 7 Sort of Reveal, Bold & Eclectic Log Cabin Living Room | The Big Reveal. Face nailing does add more labor and cost to the installation so if your installer has recommended this for your new Carlisle floor speak with your specialist to make sure it is necessary before you proceed. One of the goals in our renovation of this house has been to make choices of materials that fit the house well and honor its uniqueness. If using a pneumatic nailer/stapler, the air pressure must be set so the fastener does not drive in too deep and crack the tongue. Do you have one near you? They look amazing!
So here it is all done. TOE-NAILING In contrast, toe-nailing produces a strong joint. I have read mixed reviews on which polyurethane is tough enough to stand the test of time.
Have you considered renting a flooring nailer? You can view and download more information on installation here. Would you please tell me how you sealed them? Installing trim around your door, windows and wall edges requires face-nailing.
We set the first board in place and realized the threshold piece that butts up to the tile in the hallway needed to go in first. I didn't get a shot of the glue itself, but you get the idea. Nail down installation of wide plank solid and wide plank engineered flooring requires additional bonding to the subfloor to prevent movement and squeaks. We used Liquid Nails for subfloors to basically glue the ends of the two boards together, so they will move together with expansion and prevent cupping on the ends. I'm sure you would anyway, but make sure to use a nail set because a new fir floor is sure to dent very easily. After growing up in construction and with more than 30 years in the field, she believes a girl can swing a hammer with the best of them. Solid hardwood must be installed perpendicular to the joists or on a diagonal for any single layer subfloor. the pneumatic nailer is a charm!! The entire floor should be covered, since some species are light-sensitive and uncovered areas may change color. in fact my wife looked at me as i was face nailing the first board and said" i did not realize this will be a slow process". We adjusted the nailer to set the nails about an 1/8" above the wood because the plastic collated nails we used made shards of plastic that shot into the wood and blew out the hole. If you decide to face nail your installer will determine the size of the nail you need and the nailing pattern they will use.

We laid down a layer of this vapor barrierpaper. The floor of the kitchen in our house is original to the build. Stone, after all, would shatter, as would ceramic tiles. Link. When you are doing finish work with wood, countersink the nails to make the surface presentable. Beads of glue are applied to the back of the boards with a caulking gun. by James Tue Apr 25, 2006 8:38 pm, Post
All Rights Reserved Powered by.  Sometimes face-nailing is the best choice -- or perhaps the only choice depending on the situation. Looks fabulous.
It is commonly assumed that if you use a board over 5 wide that you must face nail the boards, or install plugs, to keep the boards flat.  my wife was giving me doubts last night as to the facenailing issue since she heard my bro in law. Aglue down installation will be more time consuming. No other flooring works well with face-nailing. So because of this issue, our workflow for each board was setting the nails, cleaning up the plastic shards, hammering the nail heads flush with the board, and then using a nail set to recess the nails slightly below the wood surface. If you want to face-nail the entire floor, drill pilot holes and use two nails side-by-side every 8 to 16 inches across the length, sinking into the floor joists wherever present. Then we used a framing nailer with 3" screw shank nails to top nail the boards into the floor joists. And. we found our boards at a local lumber yard, not Lowes or HD. Typically your installer will come in on day one to install just the first row of boards in each room, then they must wait 24-48 hours, depending on the glue before they can proceed. Face nailing is applicable where dictated by building code, in high wind areas, and when fastening is to OSB or equivalent sheathing without penetrating into studs. With Carlisles higher quality standards, SlowCraft manufacturing process and proper installation methods, we have installed boards up to 20 wide, with no face nails, that are still flat and stable today. It is very uncommon to install antique cut nails in hardwood flooring or antique wood flooring. This is due to the fact that the glue is applied in a thick layer and it will take time for the glue to cure and set up with the flooring boards in place. On boards 7 & wider cut vapor retarder in half (18) which doubles the number of glue lines. When taping sheets together, tape them to each other and not to the floor. rail, the majority of metal wood to wood conections were hand stamped cut nails.
I would love to know what you did and if you stained them or not.Thanks! Get in touch witha Wide Plank Specialist todiscuss the finish options available for the floor you have selected and provide recommendations based on the look you are trying to create.
was it acceptable? This is the most popular, and the most efficient installation method for Carlisle floors and can be used on solid wood flooring and engineered wood flooring. The Ontario Building Code requires cleats be used in all floors with a width of 4 or greater. We measured from the walls to the seam in the plywood subfloor to see if that line was square, and it was.
When you think about it, it's the most common method of nailing overall. So this gave us a good way to make sure our first board was laid square. Proceed with the installation until there is insufficient space to use the floor nailer. Your email address will not be published.
When you hear the word "face-nailed" applied to flooring, you automatically know it refers to solid wood flooring, a woodlike product or even engineered wood products.
DIY Unfinished Wide Pine Floors & if Pine Flooring is a Good Idea, How to Install Pine Flooring or Wide Pine Floors, Taking out Carpet to Install Wide Pine Flooring, Prepping Floors for the Unfinished Wide Pine Flooring, Acclimating the Wide Pine Floors & Adding a Underlayment, Installing the Wide Pine Boards with a Floor Stapler, Adding Wood Putty to the Knots in the Pine Floors, Adding Polyurethane to the Installed Pine Floors. Be sure to countersink the nail drive it slightly below the surface of the wood to prevent interference in the joint. On 5 & 6 widths use full width (36) approved vapor retarder.
By midway through the install the boards were all starting to look the same and we wasted a lot of time looking for the defects again to decide if a board was usable. Although we have much more sophisticated installation methods available today, face nailing is still used on some flooring styles. Floors and walls both. With cut nails, simply countersink them beneath the wood slightly to avoid snags and cuts. I hope it's going well! about the cut nails, yes i will look into the the ones for wood.
i should be done before the wednesday. The information provided above is for informational purposes only. Face nailing is the common practice used to nail the first few rows of boards in place because it is difficult to maneuver hardwood floor nail guns close to the wall. Undercut drywall and use tmould between the tile and hardwood when running widthwise. Here you'll find a wide range of discussions on old-house topics. What brand is glue do you recommend for 7.5 wide engineered flooring? Thanks for joining us on this crazy renovation ride! To have the most aesthetically pleasing look have no joints closer than 3 times the width of the pieces; avoid H Joints and stair stepping from not completing rows. We used a water based system. But not cut nails, blacksmith made T head finishing nails. The application methods for each of these adhesives will vary depending on the manufacturer, type of wood, subfloor, and installation conditions. The style flooring you have chosen, and the overall look you wish to create will also play a role in this decision. Please note that the exact installation methods and installation products used to install your Carlisle floor will be determined by the installation professional you have chosen for your project. Can't quite tell from the pictures. Hi, the whiteboard is lighter weight and will be very soft. The decision to face nail a floor all depends on the overall look you want to create, your personal preference and the type/thickness of your subfloor. However, if you were to factor in thecost of plywood, nails, and glue the overall average cost may be close to that of the blind nail and glue method. While that might be the case with lower quality hardwood flooring on the market, that is not the case with Carlisle floors. This past week we tackled one of the biggest projects, replacing all of the flooring in the great room and kitchen.
I love these floors! Using random lengths to eliminate any pattern where the boards end, turn each board so that the groove side of the board -- if any -- is against the wall. See how those nails line up with the nails in the other boards?  This photo is from toward the end, I forgot to take a photo earlier. I'm showing my husband now, we are really looking into new flooring and especially on a budget! now the dilemma is whether to install it with a pnenmatic nailer which will surely require some precision and time or just face nail with cut masonry nails and be done with.
FAQ: What documents do I need for my permit? the only thing I would reccommend is that you order some nailss from Tremont Nail Company. email me at hoodcreeklogcabin@gmail.com and I can send you the info for where we got ours because they have 3 locations in the southeast. The nails are driven into the tongue of the boards so when the next board is set in place the nail is hidden. i only saw cut nails used to secure the 1st boards of our 2nd floor pine floors. You may even prefer the look of a face-nailed floor, but not be able to identify it as face-nailed. To finish the last rows, treat them as in a floating floor installation by gluing the boards together at the tongue and groove; as well as brad nailing or hand nailing the boards in place. to nail the edge down and help keep the joints tight. One of the most difficult things about any building or remodeling project isn't so much the work itself but the terminology.