Email: sale@creality3dofficial.com; info@creality.com In addition, the power supply is now installed inside the 3D printer. We will recommend you make a printing temp setting test before actual start. Sign up for Lab Report to get the latest reviews and top product advice delivered right to your inbox. (or similar technologies) to collect information to help us serve advertisements and send
All these improvements make Ender 3v2 printing more stable. Try as I might, though, I couldnt get the nut to budge by hand. Text is duplicated in English and Chinese throughout. The removable glass print bed is heated by the metal plate underneath. Essential Cookies. Filament loading is the biggest minus point in the operation of the Ender 3 V2! I made several additional attempts to re-level the build plate, checking to be sure that the extruder was the proper distance from the build plate at each corner, and inserted the needle tool into the nozzle to ensure that no clog was partially obstructing the flow of molten filament, but was not able to get the first layers to properly adhere to the plate for this object despite multiple tries. Instructions in the guide are cursory; I supplemented them by watching several third-party Ender-3 V2 assembly videos. One highlight is definitely the automatic leveling print bed. Under each corner of the build plate is a knob that raises or lowers the corner depending on which way you turn it. It is very similar to the Cura open-source software that is widely used in 3D printing. The pair is bridged at the top by a crossbar. You are not able to change settings relating to
The menu of the Ender 3 V2 has also been revised and is now very similar to those of the other newer 3D printers from Creality. Load and feed consumables. For all test prints, I used the most accurate setting. These are affiliate advertising programs designed to enable websites to earn advertising revenue through advertising and linking to Amazon.com and others. The nut comes attached to the dowel and should unscrew from it in a manner similar to opening a child-proof cap to a pill bottle. Orient the pointed side of the filament toward the back of the 3D printer. After you have tucked the cables away and flashed the correct firmware, youre ready to go! Sometimes this can be problematic, and that was the case when I tested the XYZprinting da Vinci 1.0 Pro. For a good comparison and to give you an idea of how long something like this takes, I timed it for the different temperatures. Note that you have to update the mainboard with the correct firmware before you can use the printer again. Of course, you can tinker just as much with the new version, but its no longer mandatory! The cat printed flawlessly and the support structures were also no problem. For the first print, I attempted one of the test prints included on the memory card. The most complicated part of the assembly is to mount and tension the toothed belt correctly. I tried again, this time using Ender filament, but try as I could, I couldn't get it to extrude. You wont need Blue Tape or glue sticks anymore. You can also make final settings in the print menu before you print. The Ender-3 V2 is very similar in design to the Prusa i3 series and is said to have been loosely modeled on it. information. During setup, you bolt together or otherwise connect the parts mentioned above. Compared to other 3D printers, the heating rate is in the upper midfield. This allows you to move the filament back and forth much more sensitively than pushing it through by hand. The Creality Ender-3 V2 ($319.99), an upgrade to the popular Ender-3(Opens in a new window), is an inexpensive open-frame 3D printer that comes as a kit. Best Cura Settings & Profile for the FLSUN Super Racer, Creality 3D Printer Enclosure | Practical Test & Review, Ender 3 V2 + BLTouch | Step-by-Step Instructions & Guide, CRTouch | Hands-On Review & Step-by-Step Guide, Ender 3 (V2/Pro) Direct Drive Kit from Creality | Review, Improved version of the popular first version, Fast heat up (nozzle 1-2 min to 200 C, print bed 2-3 min to 60 C). You can SIGN IN
These cookies (or similar technologies), including Google Analytics, allow us
The installed power supply is a high-quality Meanwell power supply. PETG has a high melting temperature as compared to other filaments. If you click an affiliate link and buy a product or service, we may be paid a fee by that merchant. The Bowden extruder of the Ender 3 V2 does not handle flexible filaments like TPU* very well. does anyone know how to fix this? Welcome back! You can choose not to allow certain types of
To use up the leftovers of the PLA supplied, I printed this storage box. It has several openings to operate the 3D printer and a large opening to open the complete front and top. Only some stringing, but this could be removed with fingers. M420 S1 G-Code | In-Depth Guide with Simple Examples. A tungsten nozzle* is much more durable than a normal hardened steel nozzle. can be applied on almost every board after configuring the Firmware.CR Touch is upgraded to a metal probe, which reduces wear and tear and greatly prolongs its service life. An image of the object you wish to print shows up in a visualization of the print bed. You may unsubscribe from the newsletters at any time. Over the years, I have reviewed iPad and iPhone science apps, plus the occasional camera, laptop, keyboard, and mouse. YES. third-party cookies and pixels to improve our services, display relevant advertisements and obtain
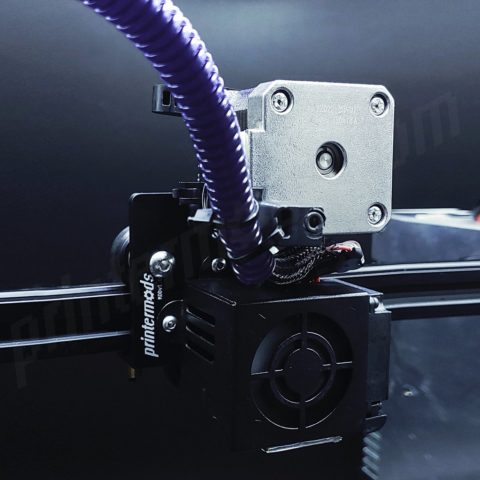
The displays quality and size are absolutely sufficient. There are many ways you can equip the Ender 3 V2 with a Direct Drive System. He is happy to share his experience with each new article. Easier Maintenance: Pre-installed X and Y-Axis belt tension make it even easier to keep your machine printing at its best. With the Ender-3 V2 it's a straightforward enough process, but it still can prove tricky. Yes, you could connect via a ceality wifibox, and operate it in Creality Cloud. After that, you can do the leveling as described above. The Ender-3 V2 is not included in Cura's pull-down menu of supported printers, but it worked fine when I chose a different Creality model, the Ender-3 Pro. The spool holder for your filament is attached to the top crossbar, and an LCD is bolted onto the base, to the right of the build platform. It produces generally above-par prints, but its print bed can be tricky to keep leveled. Because they allow us to provide you with a unique shopping experience. Answer:
Even if the package is dropped or thrown once or twice during transport, nothing should happen here. With this feature, this is not so bad anymore.
I earn from qualifying purchases if you decide to make a purchase through these links at no additional cost for you! Keep a "level" head around this budget 3D printer. considered, your preferences, identifiers, your device, and inferences made from this To test the print quality in practice, I printed various test objects and also things that I actually need. Once you click on the image, you can move, scale, rotate, and otherwise manipulate it. to avoid warping), a closed build space is important. If you have to deal with ghosting or ringing, for example, you will have to adjust the belt tension here and there. On the bottom side, there is quite a lot of space between the four feet which I filled with tree supports. However, if the filament is not perfectly straight and pointed, it is simply fed out of the extruder past the rotary wheel. Another horizontal beam, which can move up and down between the extrusions by means of a vertical screw and small rubber wheels, holds the extruder, which also slides side to side. Its base with power supply, mainboard, print bed and co. is already completely pre-assembled. The base has a slot for a microSD card, as well as a micro-USB port. Connect cables (the cables are all marked, which eliminates the possibility of incorrect connection). Some can be described more as a kit where you have to assemble everything. Until the power returns, the Ender 3 V2 continues its operation exactly where it left off. You adjust the distance between the nozzle and the print bed so that a normal piece of paper (with a thickness of approx. advertising partners. However, the built-in fans are not the best and the 3D printer reaches a total of approx. Please check whether the wiring is normal. Its very frustrating when you have a 10-hour print and the power goes out near the end and you have to start over. It is better that you could send us the videoand we could check better? You can do very little wrong here and are unlikely to encounter any major difficulties.. Overall, the new version is a strong improvement and recommended to every beginner! The assembly is quite simple: in principle, you only need to replace the old extruder with the new one. Creality's Ender-5 Pro(Opens in a new window), which I tested concurrently with the V2, uses the same dowel-and-nut combo, but I was able to separate them on the first try, no wrench needed. 1202, Block 3, JinChengYuan, Tongsheng Community,Dalang, Longhua District, Longhua District, Shenzhen,China, 518109, Updated mainboard with silent TMC2208 stepper drivers: Compared to the. It is recommended to adjust the printing speed to 30%-50% of the normal printing speed by rotating the knob when printing the first layer. A: Do not stick to the heated bed, the following adjustments are recommended: 1) It may be a leveling problem, please refer to the linked video for leveling. With the Direct Drive Extruder Upgrade, this is of course much better solved. All parts are well protected wrapped in matching foam. With this upgrade*, you can completely illuminate the printing area of the Ender 3 V2. The Ender 3 V2* is the successor of the legendary Ender 3*. These include various third-party constructions (example on Amazon*) or the official kit from Creality*. Where the original version of the Ender 3 required a lot of tinkering, the Ender 3 V2 is a 3D printer that you can start right away. including through the use of cookies (or similar technologies). now to see them, or whenever you're ready to check out. The type here, too, is small and hard to read at times (though most of the steps are more comprehensible than the example I give above), and the descriptions of problems and solutions are curt. If you have selected the wrong voltage, the printer will smoke when you switch it on and will not work! If you find manual leveling annoying, this upgrade is for you! The front of the base also has a built-in tool drawer to hold the wrenches, cleaning needle, and Allen keys that come with the printer. The quality, reliability and accuracy of this workhorse are outstandingly good for this price range. With the dog, I noticed that the 3D printer quickly reaches its accuracy limits with small details. X and Z axes (profiles, toothed belts, screw rod, X-axis with extruder, toothed belt and printhead. But dont worry, its all a matter of practice! After that, printing with ABS was no longer a problem. You control its non-touch screen with a knob below the screen. If too much is pre-assembled, the package gets bigger and also the price increases, because the assembly takes time. Unfortunately, it is not a touchscreen and is operated with a rotary knob. The menu is very intuitive, so you can quickly find everything with just a few clicks. Please do not use IPA to wipe the glass plate. The complete print went through smoothly and delivered a very impressive result! However, there are also purchasable solutions that are less error-prone. For example, the nozzle may become clogged or the print bed adhesion may be suboptimal. Click on the different category headings to find out more and change our default
Links marked with * are affiliate links. creality ender silenciosa trinamic In retrospect, I suspect the problem wasn't with the filament, but that the nozzle was set a little too close to the print bed, touching it in places so that filament wouldn't come out and causing the clog. You need to assemble the following components one by one: Before you turn on the 3D printer, make sure that the switch on the back of the device is set to the correct supply voltage. There is a silicone protector around the nozzle. Martin Ltkemeyer is a member of the Amazon Services LLC and other Affiliate Programs. The printed object is quite large and has filled almost the entire width of the print bed. You can choose between 115 and 230 V, depending on which power supply you have. Often, the filament goes out the side of the extruder as it misses the opening at the end of the extruder and is then deflected. US/CA/AU/UK/EU 9+Local Warehouses & Free Fast Delivery! This makes it much less sensitive to external electromagnetic fields. I ultimately had to remove it using a wrench that could open wide enough to securely grasp it. For the Ender 3 V2, this is only a slight improvement. The spool-holder dowel is held in place on the spool holder with a plastic nut, about an inch in diameter. Because it's a kit, just know that if you encounter any construction or setup problems, they can increase your build time considerably. If you want to use more exotic filaments that need a constant temperature (e.g. From the Prepare menu, you can preheat filament (there are menu items for heating PLA and ABS) and disable the stepper motors, which allows you to manually move the extruder and build platform. The Ender-3 V2 includes a user manual, which is mostly a setup guide. Also included are a spec sheet and a comprehensive parts list (erroneously titled "Spare Parts"), with illustrations and names for each part. Color 4.3 inch LCD Display with Rotary Knob. PETG is also one of the filaments that the Ender 3 V2 can handle. creality 400mm 

I earn from qualifying purchases if you decide to make a purchase through these links at no additional cost for you! Keep a "level" head around this budget 3D printer. considered, your preferences, identifiers, your device, and inferences made from this To test the print quality in practice, I printed various test objects and also things that I actually need. Once you click on the image, you can move, scale, rotate, and otherwise manipulate it. to avoid warping), a closed build space is important. If you have to deal with ghosting or ringing, for example, you will have to adjust the belt tension here and there. On the bottom side, there is quite a lot of space between the four feet which I filled with tree supports. However, if the filament is not perfectly straight and pointed, it is simply fed out of the extruder past the rotary wheel. Another horizontal beam, which can move up and down between the extrusions by means of a vertical screw and small rubber wheels, holds the extruder, which also slides side to side. Its base with power supply, mainboard, print bed and co. is already completely pre-assembled. The base has a slot for a microSD card, as well as a micro-USB port. Connect cables (the cables are all marked, which eliminates the possibility of incorrect connection). Some can be described more as a kit where you have to assemble everything. Until the power returns, the Ender 3 V2 continues its operation exactly where it left off. You adjust the distance between the nozzle and the print bed so that a normal piece of paper (with a thickness of approx. advertising partners. However, the built-in fans are not the best and the 3D printer reaches a total of approx. Please check whether the wiring is normal. Its very frustrating when you have a 10-hour print and the power goes out near the end and you have to start over. It is better that you could send us the video