I got this amazing idea of recycled jewelry when I found leftover wood pieces at the construction site.
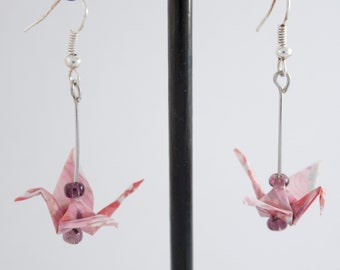
When it prints out, don't touch the photos. You should have a button that says "Rotate" (if not, there should be a button near the top of the page that says "Flip Horizontally" or something similar). Once my photo is the size I want, I need two of them. origami earrings wood flower power daisy blossom cherry yellow customer storenvy feedback orders rating past Trace the circles onto the back of scrapbook paper. amzn_assoc_placement = "adunit0"; Note: Dip your paintbrush into the turpentine oil and wipe it thoroughly using a damp cloth. She enjoys making her house a home and encouraging other Momma's in the crazy and blessed life of motherhood! I wanted some fan girl jewelry and couldn't afford to just go buy something, so I needed to make it myself.
amzn_assoc_ad_mode = "manual"; (not pictured), 11. how to cut wood carefully using a hacksaw, wooden jewelry making supplies in detail here is one more tutorial for you. Wipe away any Mod Podge that comes out the sides and let dry for 15 20 minutes. earrings ghost diy halloween jewelry paper The cork inlay pieces nestle perfectly into the engraved area of the laser cut wood earrings! *If Mod Podge works for you as a sealer on clay, cool. The image should flip to be the reverse of what it was. https://www.michaels.com/wood-discs-1.5-inch/10049505.html. Your email address will not be published. Make sure your hands are dry and try to just pick up the paper using the edge so you don't possibly mess up your photo. I would love to see them! Let it dry for 10-15 minutes. As an Amazon Associate I earn from qualifying purchases. Now that your pieces are dry, flip them over and apply glue to the back. I could make several pairs for myself and for my mom (Mothers Day is coming!) With SO many awesome patterned cork fabrics available, youre going to want to make these laser cut wood earrings in ALL the different styles! Step 5.Cut around the edging to get it as close to the charm as possible. novica dangle pampam So Lets begin with step-by-step instructions. Now we need to resize the image. How about you? This is by far the most skillful and economical craft one can try at home. Click this button. I use a fine grit, 180 to be precise. Add a small amount of E600 adhesive to the back of the cork pieces, then place the cork into the wood earrings. Creative inspiration for the entire family! DISCLOSURE & PRIVACY POLICY | Birch on Trellis Framework by Mediavine, stain marker- (I used Rustoleums Dark Walnut). 4 Fun DIY Lipstick Hacks Using Crayons, Kool-Aid, Sugar & More! Then, I just thought to reuse them before it gets trashed out and let me tell you I am a huge fan of eco-friendly crafts. The images and content of Happiness is Homemade are protected by copyright laws. Weekly newsletter filled with the latest projects, printables, party ideas and more! Mine is an inkjet.
  Your photos need to be on a computer or laptop that has a word document program. Now that your fabric-covered wooden earrings are almost complete, add a top layer of Mod Podge to the front part of the earring to help seal it. Now you know how to make earrings with whatever you want on them. When the Mod Podge has dried, do another coat. fabindia alankar kashmiri amna Carefully, keep a gap between your hand and a hacksaw and start to cut slowly. I generally do three. Also, if you want to make more than one pair or earrings then you can adjust the number where it says "Project Copies" and then hit apply.
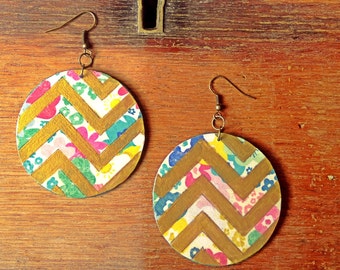
  Get your favorite activities and products here! wood paper earrings scrapbooking roses chevron scrapbook rose wanelo podge modge jewelry pap If linking to one of my free printables only link to my blog post, not the printable link. amzn_assoc_region = "US";
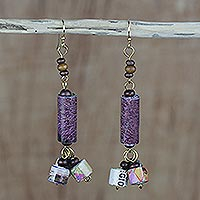
Your email address will not be published. Theyre great as handmade gifts for anyone who loves jewelry. Then click on the "Make" button. }, { I have also added some woodworking tools as we are learning from scratch. I find if Im always making something of the same size, punches are nice. Brush on a top layer of glue over your image. You can leave this step if you like. Ans. Then click "Flip Horizontally" from the options. Place your paper circle on top of the circle disc. A printer with colored ink (if your photo is colored). They are softwood type and light in weight. Waterproofing is an essential part that is mostly forgotten by designers. Yes, it is difficult for a beginner, you have to be super alert while working with a hacksaw. We will have two later. See, I told you this tutorial would be fun and easy! Feel free to tag me @madetobeamomma on any social media platform to show me your creations! Be careful to apply it as evenly as possible. 3. Get inspired and learn how to cover wood earrings with fabric. Recently I found something really interesting about the aromatic property of wood such as. Apply glue right on top. 1. Also, if you want to get shapes as per your choice you can do it by using a Dremel machine, laser cutter technology, or get your desired shapes from a carpenter. You will smear the ink. jewelry paper earrings handmade beads wood pearls visit instagram fabric Lets get started! Mod Podge or Polyurethane Varnish or some other sealer.
This is to avoid your earring hooks dropping off. You can skip and get desired wood shapes by the carpenter. Repeat with other wooden circle. Im so glad youre here! This post and its photos may contain affiliate links. Are these the ones you bought? amzn_assoc_linkid = "e7edc3c9706d60e62b57f24039af09c5"; Did you make this project? Cut out the traced photo carefully and set it with the wooden piece that you traced around. For every jewelry designer Ideation is the first step you should keep in mind. But if you want both sides covered in fabric, glue the second fabric piece to the other side. Alternatively, if you have circle punches the correct size, you can use those. amzn_assoc_asins = "B01EUG3HMC,B013OSFP9K,B00178ORGM,B001EWPYXG"; Begin by gathering your supplies. "height": 357, "width": 634, / Design by. About: Clay and Jewelry Artist; All-around Creator, Wet Formed Leather Harmonica Case With 3d Printed Logo. You can go smaller, larger, or do multiple sizes together.
Add a little glue in the area you sanded down and add a little more glue to the post itself. They are eye catching, so people notice them. Select whatever material you are using. Ans. Turn on the Glowforge and place the masked walnut wood into the machine on top of the crumb tray. novica suma akwele Subscribe below to get your freebie in the first email! I click off the photo and onto a blank part of the document, right click and hit 'paste'. I cant wait to play around with it some more! If you want to do the earring post option (for stud earrings), go ahead and grab your glue, clips, and a small piece of sandpaper. Resize the photo by clicking on the down buttons by width and height. Step 8: Once Glue is Cured, Spray With Varnish {Optional}. Step 3. Take a pencil and start outlining designs on the wood pieces for wood cutting. Before moving onto the next step, let the fabric-covered wooden earrings dry for 15 minutes. Mask the patterned side of the cork fabric, and place it masked side up in the bed of the Glowforge. *It may layer the copy on top of the other layer. Use Turpentine oil and wipe it with a damp cotton cloth. Pay attention! Now, go ahead and grab your wax paper, Mod Podge, and sponge applicator. Don't use a ton and don't move your brush around a whole lot or it will smear the photo. Brush on a light coat of glue on thewood charm and press the image on top of the surface. It makes it a lot smoother than just trying to make the jump ring poke a hole later. You can carefully hold onto the wood piece with one hand while running the drill with the other. Free printables are for personal use only and may not be altered in any way. Youre basically slicing off the fabric. You can buy jewelry supplies from the local market or directly from the Amazon store. Step 1. I right click on my photo and hit 'copy'. Ok, I am gonna be honest, I don't normally use Mod Podge as a sealer. You can make any design such as triangular shape, oval, square, circle, etc. They can be whatever size you want, but you want them to be a size that you can wear comfortably. If you have a budget, you can buy Dremel which has amazing multi-functionality features of woodcutting, carving, sanding, etc. Now you know how to make fabric-covered earrings at home. Voila! I love it. I am going to use the largest circle size I have (you can see in the photo how big it is), but size is up to you. (The reverse/forward button is a little push in button that you should find somewhere above the speed trigger. I have had many compliments on mine when I wore them. Im not exactly sure if there is a right way to do this part, if you are supposed to use certain sizes or not but I just did what worked for me! You dont have to purchase wood from the market. You only need a few simple supplies, so lets get started! Click on it. Remove the wooden circle. Choosing a selection results in a full page refresh. Just make sure your fingers are no where near the drill bit.
Cricut Design Space will then show you the project on the mat. You push on it one way and the drill runs in reverse. To do that, we need to flip one of the photos horizontally. Let me know in the comments! Again, this step is optional. Out of the wood circles, select the size that you want for your earrings. In my case, the outermost semi-circles on the African continent stick out on either end.
If youre learning woodcutting Stay Super Alert and dont rush as it may harm your hand. For basswood you will use the Strong Grip Mat. Holding the drill straight up from the wood piece, place the bit where you want the hole. Required fields are marked *. I will receive a small commission from these sales at no additional cost to you! Adjust the material size if you need to. You have successfully joined our creative community! Do the same with the other photo and other wooden piece. The hole might have little rough edges, so we will sandpaper that. Friends, first I am going to let you know that I am NOT a jewelry maker. Since the document is at 100% it is pretty close to actual size, so I can make a good guess at how big it needs to be. How to make wooden earrings from scratch. Lay your wooden pieces on your scrap fabric, and if necessary, cut out an area of the fabric thats big enough to work with. Jewelry findings jump rings (7mm and 10mm) and 1 earring hooks. amzn_assoc_title = "Supplies:";
She is a mommy blogger who loves crafting, diy projects for the home, cooking, and baking for her family. Place the paper down on the wood and smooth. These Floral Wooden Mod Podge Earrings are a fun a simple craft idea that you can wear to match any style! Rub your wood piece thoroughly till you see the scratches are completely gone. The trick is to be gentle and slow when bending any metal piece so it doesnt break. Yay, now its complete!! If you don't have scrap pieces, or you don't want to mess with that, you can buy premade little wood circles, squares, and other shapes at craft stores. To add an earring loop, pierce a hole through the wooden piece on the center-top. *Alternatively, hold the piece in your fingers while you drill, but this is more dangerous! 2022, Made To Be A Momma. I only do a little bit at a time so I can see how small it made the photo as I go. Grab your X-Acto knife and cut around the shape of your wooden earring. Made to be a Momma is a place to embrace all things homemaking, sharing delicious recipes, diy craft tutorials, kids crafts and more! Its completely your choice. ), Shrinky Dink Jewelry: Necklace and Earrings, Wine Bottle Decor: 35+ Great Crafts for Your Home. Thank you! Its a fun, straightforward project that will save you the heartache of throwing away your fabric scraps! When I spotted these spring earrings from Maggie, I realized that I need something to do with the large amount of wood circles that I have in my stash. Cut the cork and remove from machine. Since I was able to do it as a beginner, I think that these wooden photo earrings are definitely a project that the jewelry artist who is just starting out will benefit from. Make sure to do this slowly because if you go too fast you may cause your piece to move or you might crack the wood.
what are the thickness of the wood discs? All you need is to take the plunge, practice slowly and youll master this craft in no time. The other advantage to this is if you used a matte finish and decide you wanted it glossy, you can add some shine using a gloss varnish. shopdelighted This post may contain affiliate links. I think that gives it a polished look. One of my favorite things to make with my Glowforge laser cutter is jewelry, and these laser cut wood earrings are one of my favorite projects ever! "id": "7464535",
They are great for craft groups, parties and gifts! These are actually some of the first pieces I ever made when I started getting interested in making jewelry. I turn the drill to run forwards. This step is optional but interesting. suma novica When the machine is finished cutting and engraving, remove the earring pieces and wood sheet from the Glowforge. Depending on the type of patterned paper you pick your earrings may not look exactly the same. If you hit 'paste' and it looks like nothing happened, move the photo to see if there is two on top of each other. The most economical method- reuse wood pieces and manually cut wood shapes. I have elucidated some insights on wood types because I completely understand it may be difficult for beginners but let me tell you- it is doable. Mask the patterned side of the cork fabric, and place it masked side up in the bed of the Glowforge. For questions contact me using this form. Friends, I hope this tutorial has brought some clarity on working with leftover wood. This will help protect the image and make it more likely to last a very long time! Mark a center point carefully with correct gaps at the top of the wood shape and drill a small hole. Now add your jump rings and fish hook earring pieces. All Rights Reserved. Scrape it slowly on wood shape. Since I bought a variety pack, I have a couple sizes to pick from. Under "File" there is the 'Print' button. Your email address will not be published. Slowly I run the drill until the end closes around the drill bit. amzn_assoc_search_bar = "true"; Upload the Cork Earring SVG File to the Glowforge App software. Add a small amount of E600 adhesive to the back of the cork pieces, then place the cork into the wood earrings. It will give us the options for printing. in one fell swoop. Required fields are marked *. If you are cutting into a new piece of basswood then you won't need to move the earrings BUT if you are using a scrap or a piece you've already cut in to for other projects then this is the screen where you will be able to move the earrings on the mat. Looking for a Makeup Tutorial to Celebrate Taylor's Rerelease Red. DO NOT distribute or copy the content found within this blog without written permission. Unfortunately, months later my pieces were attracting every bit of dust that came along because the Mod Podge stayed kinda sticky, so I ditched using that as a sealer and started using polyurethane. Take a thin paintbrush and gently apply varnish in small amounts to wooden earrings. Click "Print," press the flashing button on your Glowforge machine, and watch the magic happen! Sand off a small area where youll be putting your earring post. Right click on the image and hit 'properties'. by Poorvi Tiwari | Aug 13, 2020 | DIY Wooden Jewellery | 0 comments. Grasp the loop of the hook and twist the whole loop sideways so that the loop is no longer in a straight line in with the rest of the hook (the photo illustrates better what I mean). You may wish to use hold down pins to keep the sheet securely in place. Small drill bit: mine is a #55 with a 118 degree point, 4. So, dont ever skip this step. Let your circles dry completely. Make sure that the outer teardrops are set to cut and that the inner teardrops are set to engrave (we used the Proofgrade settings for Medium Walnut Hardwood).
When it prints out, don't touch the photos. You should have a button that says "Rotate" (if not, there should be a button near the top of the page that says "Flip Horizontally" or something similar). Once my photo is the size I want, I need two of them. origami earrings wood flower power daisy blossom cherry yellow customer storenvy feedback orders rating past Trace the circles onto the back of scrapbook paper. amzn_assoc_placement = "adunit0"; Note: Dip your paintbrush into the turpentine oil and wipe it thoroughly using a damp cloth. She enjoys making her house a home and encouraging other Momma's in the crazy and blessed life of motherhood! I wanted some fan girl jewelry and couldn't afford to just go buy something, so I needed to make it myself.
amzn_assoc_ad_mode = "manual"; (not pictured), 11. how to cut wood carefully using a hacksaw, wooden jewelry making supplies in detail here is one more tutorial for you. Wipe away any Mod Podge that comes out the sides and let dry for 15 20 minutes. earrings ghost diy halloween jewelry paper The cork inlay pieces nestle perfectly into the engraved area of the laser cut wood earrings! *If Mod Podge works for you as a sealer on clay, cool. The image should flip to be the reverse of what it was. https://www.michaels.com/wood-discs-1.5-inch/10049505.html. Your email address will not be published. Make sure your hands are dry and try to just pick up the paper using the edge so you don't possibly mess up your photo. I would love to see them! Let it dry for 10-15 minutes. As an Amazon Associate I earn from qualifying purchases. Now that your pieces are dry, flip them over and apply glue to the back. I could make several pairs for myself and for my mom (Mothers Day is coming!) With SO many awesome patterned cork fabrics available, youre going to want to make these laser cut wood earrings in ALL the different styles! Step 5.Cut around the edging to get it as close to the charm as possible. novica dangle pampam So Lets begin with step-by-step instructions. Now we need to resize the image. How about you? This is by far the most skillful and economical craft one can try at home. Click this button. I use a fine grit, 180 to be precise. Add a small amount of E600 adhesive to the back of the cork pieces, then place the cork into the wood earrings. Creative inspiration for the entire family! DISCLOSURE & PRIVACY POLICY | Birch on Trellis Framework by Mediavine, stain marker- (I used Rustoleums Dark Walnut). 4 Fun DIY Lipstick Hacks Using Crayons, Kool-Aid, Sugar & More! Then, I just thought to reuse them before it gets trashed out and let me tell you I am a huge fan of eco-friendly crafts.
 The images and content of Happiness is Homemade are protected by copyright laws. Weekly newsletter filled with the latest projects, printables, party ideas and more! Mine is an inkjet. Your photos need to be on a computer or laptop that has a word document program. Now that your fabric-covered wooden earrings are almost complete, add a top layer of Mod Podge to the front part of the earring to help seal it. Now you know how to make earrings with whatever you want on them. When the Mod Podge has dried, do another coat. fabindia alankar kashmiri amna Carefully, keep a gap between your hand and a hacksaw and start to cut slowly. I generally do three. Also, if you want to make more than one pair or earrings then you can adjust the number where it says "Project Copies" and then hit apply.
 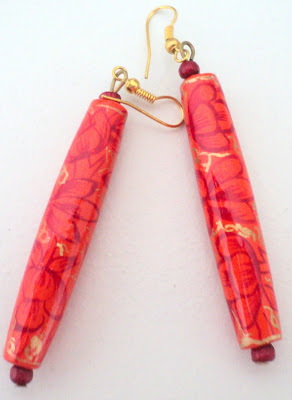 Get your favorite activities and products here! wood paper earrings scrapbooking roses chevron scrapbook rose wanelo podge modge jewelry pap If linking to one of my free printables only link to my blog post, not the printable link. amzn_assoc_region = "US";
Your email address will not be published. Theyre great as handmade gifts for anyone who loves jewelry. Then click on the "Make" button. }, { I have also added some woodworking tools as we are learning from scratch. I find if Im always making something of the same size, punches are nice. Brush on a top layer of glue over your image. You can leave this step if you like. Ans. Then click "Flip Horizontally" from the options. Place your paper circle on top of the circle disc. A printer with colored ink (if your photo is colored). They are softwood type and light in weight. Waterproofing is an essential part that is mostly forgotten by designers. Yes, it is difficult for a beginner, you have to be super alert while working with a hacksaw. We will have two later. See, I told you this tutorial would be fun and easy! Feel free to tag me @madetobeamomma on any social media platform to show me your creations! Be careful to apply it as evenly as possible. 3. Get inspired and learn how to cover wood earrings with fabric. Recently I found something really interesting about the aromatic property of wood such as. Apply glue right on top. 1. Also, if you want to get shapes as per your choice you can do it by using a Dremel machine, laser cutter technology, or get your desired shapes from a carpenter. You will smear the ink. jewelry paper earrings handmade beads wood pearls visit instagram fabric Lets get started! Mod Podge or Polyurethane Varnish or some other sealer.
This is to avoid your earring hooks dropping off. You can skip and get desired wood shapes by the carpenter. Repeat with other wooden circle. Im so glad youre here! This post and its photos may contain affiliate links. Are these the ones you bought? amzn_assoc_linkid = "e7edc3c9706d60e62b57f24039af09c5"; Did you make this project? Cut out the traced photo carefully and set it with the wooden piece that you traced around. For every jewelry designer Ideation is the first step you should keep in mind. But if you want both sides covered in fabric, glue the second fabric piece to the other side. Alternatively, if you have circle punches the correct size, you can use those. amzn_assoc_asins = "B01EUG3HMC,B013OSFP9K,B00178ORGM,B001EWPYXG"; Begin by gathering your supplies. "height": 357, "width": 634, / Design by. About: Clay and Jewelry Artist; All-around Creator, Wet Formed Leather Harmonica Case With 3d Printed Logo. You can go smaller, larger, or do multiple sizes together.
Add a little glue in the area you sanded down and add a little more glue to the post itself. They are eye catching, so people notice them. Select whatever material you are using. Ans. Turn on the Glowforge and place the masked walnut wood into the machine on top of the crumb tray. novica suma akwele Subscribe below to get your freebie in the first email! I click off the photo and onto a blank part of the document, right click and hit 'paste'. I cant wait to play around with it some more! If you want to do the earring post option (for stud earrings), go ahead and grab your glue, clips, and a small piece of sandpaper. Resize the photo by clicking on the down buttons by width and height. Step 8: Once Glue is Cured, Spray With Varnish {Optional}. Step 3. Take a pencil and start outlining designs on the wood pieces for wood cutting. Before moving onto the next step, let the fabric-covered wooden earrings dry for 15 minutes. Mask the patterned side of the cork fabric, and place it masked side up in the bed of the Glowforge. *It may layer the copy on top of the other layer. Use Turpentine oil and wipe it with a damp cotton cloth. Pay attention! Now, go ahead and grab your wax paper, Mod Podge, and sponge applicator. Don't use a ton and don't move your brush around a whole lot or it will smear the photo. Brush on a light coat of glue on thewood charm and press the image on top of the surface. It makes it a lot smoother than just trying to make the jump ring poke a hole later. You can carefully hold onto the wood piece with one hand while running the drill with the other. Free printables are for personal use only and may not be altered in any way. Youre basically slicing off the fabric. You can buy jewelry supplies from the local market or directly from the Amazon store. Step 1. I right click on my photo and hit 'copy'. Ok, I am gonna be honest, I don't normally use Mod Podge as a sealer. You can make any design such as triangular shape, oval, square, circle, etc. They can be whatever size you want, but you want them to be a size that you can wear comfortably. If you have a budget, you can buy Dremel which has amazing multi-functionality features of woodcutting, carving, sanding, etc. Now you know how to make fabric-covered earrings at home. Voila! I love it. I am going to use the largest circle size I have (you can see in the photo how big it is), but size is up to you. (The reverse/forward button is a little push in button that you should find somewhere above the speed trigger. I have had many compliments on mine when I wore them. Im not exactly sure if there is a right way to do this part, if you are supposed to use certain sizes or not but I just did what worked for me! You dont have to purchase wood from the market. You only need a few simple supplies, so lets get started! Click on it. Remove the wooden circle. Choosing a selection results in a full page refresh. Just make sure your fingers are no where near the drill bit.
Cricut Design Space will then show you the project on the mat. You push on it one way and the drill runs in reverse. To do that, we need to flip one of the photos horizontally. Let me know in the comments! Again, this step is optional. Out of the wood circles, select the size that you want for your earrings. In my case, the outermost semi-circles on the African continent stick out on either end.
If youre learning woodcutting Stay Super Alert and dont rush as it may harm your hand. For basswood you will use the Strong Grip Mat. Holding the drill straight up from the wood piece, place the bit where you want the hole. Required fields are marked *. I will receive a small commission from these sales at no additional cost to you! Adjust the material size if you need to. You have successfully joined our creative community! Do the same with the other photo and other wooden piece. The hole might have little rough edges, so we will sandpaper that. Friends, first I am going to let you know that I am NOT a jewelry maker. Since the document is at 100% it is pretty close to actual size, so I can make a good guess at how big it needs to be. How to make wooden earrings from scratch. Lay your wooden pieces on your scrap fabric, and if necessary, cut out an area of the fabric thats big enough to work with. Jewelry findings jump rings (7mm and 10mm) and 1 earring hooks. amzn_assoc_title = "Supplies:";
She is a mommy blogger who loves crafting, diy projects for the home, cooking, and baking for her family. Place the paper down on the wood and smooth. These Floral Wooden Mod Podge Earrings are a fun a simple craft idea that you can wear to match any style! Rub your wood piece thoroughly till you see the scratches are completely gone. The trick is to be gentle and slow when bending any metal piece so it doesnt break. Yay, now its complete!! If you don't have scrap pieces, or you don't want to mess with that, you can buy premade little wood circles, squares, and other shapes at craft stores. To add an earring loop, pierce a hole through the wooden piece on the center-top. *Alternatively, hold the piece in your fingers while you drill, but this is more dangerous! 2022, Made To Be A Momma. I only do a little bit at a time so I can see how small it made the photo as I go. Grab your X-Acto knife and cut around the shape of your wooden earring. Made to be a Momma is a place to embrace all things homemaking, sharing delicious recipes, diy craft tutorials, kids crafts and more! Its completely your choice. ), Shrinky Dink Jewelry: Necklace and Earrings, Wine Bottle Decor: 35+ Great Crafts for Your Home. Thank you! Its a fun, straightforward project that will save you the heartache of throwing away your fabric scraps! When I spotted these spring earrings from Maggie, I realized that I need something to do with the large amount of wood circles that I have in my stash. Cut the cork and remove from machine. Since I was able to do it as a beginner, I think that these wooden photo earrings are definitely a project that the jewelry artist who is just starting out will benefit from. Make sure to do this slowly because if you go too fast you may cause your piece to move or you might crack the wood.
what are the thickness of the wood discs? All you need is to take the plunge, practice slowly and youll master this craft in no time. The other advantage to this is if you used a matte finish and decide you wanted it glossy, you can add some shine using a gloss varnish. shopdelighted This post may contain affiliate links. I think that gives it a polished look. One of my favorite things to make with my Glowforge laser cutter is jewelry, and these laser cut wood earrings are one of my favorite projects ever! "id": "7464535",
They are great for craft groups, parties and gifts! These are actually some of the first pieces I ever made when I started getting interested in making jewelry. I turn the drill to run forwards. This step is optional but interesting. suma novica When the machine is finished cutting and engraving, remove the earring pieces and wood sheet from the Glowforge. Depending on the type of patterned paper you pick your earrings may not look exactly the same. If you hit 'paste' and it looks like nothing happened, move the photo to see if there is two on top of each other. The most economical method- reuse wood pieces and manually cut wood shapes. I have elucidated some insights on wood types because I completely understand it may be difficult for beginners but let me tell you- it is doable. Mask the patterned side of the cork fabric, and place it masked side up in the bed of the Glowforge. For questions contact me using this form. Friends, I hope this tutorial has brought some clarity on working with leftover wood. This will help protect the image and make it more likely to last a very long time! Mark a center point carefully with correct gaps at the top of the wood shape and drill a small hole. Now add your jump rings and fish hook earring pieces. All Rights Reserved. Scrape it slowly on wood shape. Since I bought a variety pack, I have a couple sizes to pick from. Under "File" there is the 'Print' button. Your email address will not be published. Slowly I run the drill until the end closes around the drill bit. amzn_assoc_search_bar = "true"; Upload the Cork Earring SVG File to the Glowforge App software. Add a small amount of E600 adhesive to the back of the cork pieces, then place the cork into the wood earrings. It will give us the options for printing. in one fell swoop. Required fields are marked *. If you are cutting into a new piece of basswood then you won't need to move the earrings BUT if you are using a scrap or a piece you've already cut in to for other projects then this is the screen where you will be able to move the earrings on the mat. Looking for a Makeup Tutorial to Celebrate Taylor's Rerelease Red. DO NOT distribute or copy the content found within this blog without written permission. Unfortunately, months later my pieces were attracting every bit of dust that came along because the Mod Podge stayed kinda sticky, so I ditched using that as a sealer and started using polyurethane. Take a thin paintbrush and gently apply varnish in small amounts to wooden earrings. Click "Print," press the flashing button on your Glowforge machine, and watch the magic happen! Sand off a small area where youll be putting your earring post. Right click on the image and hit 'properties'. by Poorvi Tiwari | Aug 13, 2020 | DIY Wooden Jewellery | 0 comments. Grasp the loop of the hook and twist the whole loop sideways so that the loop is no longer in a straight line in with the rest of the hook (the photo illustrates better what I mean). You may wish to use hold down pins to keep the sheet securely in place. Small drill bit: mine is a #55 with a 118 degree point, 4. So, dont ever skip this step. Let your circles dry completely. Make sure that the outer teardrops are set to cut and that the inner teardrops are set to engrave (we used the Proofgrade settings for Medium Walnut Hardwood).