I also used wood glue, just as added security. Is there a purchase one has to make to get details? Keeping your wide assortment of clamps in one place and near your assembly table or workbench is like herding cats.
 Great! From a 1/2" x 6 board (5 1/2" actual width), cut three Cleats to length as shown in the cutting diagram. These are third party technologies used for things like interest based Etsy ads. I have the gravity stand that goes with it, but its certainly not necessary. Mill 24 dimensional lumber straight and square to make these brackets. Position three bridge subassemblies and two end assemblies 1-14 apart on the back panels; this slot spacing will enable you to slide 3/4 I.D. After viewing product detail pages, look here to find an easy way to navigate back to pages you are interested in. Next, I drilled pocket holes into the ends of the wedges and dry-fitted everything. I first use glue and pin nails for alignment, then reinforce with 1.25 screws. The braces are notched into the bracket arms in a simple version of a timber-frame joint.
Use at least four beefy screws, and more if you can. I chose not to use glue or nails here in case I ever need to take the rackapart.
Digital file type(s): 1 JPG, 1 PDF, 1 TXT, 1 ZIP, Ship items back within: 30 days of delivery. I think I need to make something like this to organise them! To begin, you need to figure out three things: slot size, slot spacing, and slot length. firewood woodarchivist Vintage, handmade, refurbished, or modified electrical or electronic products may not meet current safety standards and may not be in safe working order. If your handles go towards the wall, your slots will be much shorter, as only the distancebehind the head gets slotted out, and the top jaw rests on solid wood. First, cut them into 16, 11-14 square blanks, then miter-cut one edge of each to 45 degrees, following the Drawings. There was a problem subscribing you to this newsletter. Electrical or electronic products may pose a risk of fire or electrocution. Can't decide what to get the woodworker in your life. Disclaimer: Etsy assumes no responsibility for the accuracy, labeling, or content of sellers' listings and products. Dont you just love DIY projects that are fast, free, and easy? Face the beveled edges of the wall cleats up and toward the wall before driving stout screws or lags into counterbored holes in the cleat. Then remove the pointed nose from the parts. No stuck clamps!). You may find your spring clamps in one corner of the shop, hand screws in another, your strap clamps in a drawer, and your bar clamps scattered all over. Locking C-clamp support4. Without the slots, you'd have to tighten the jaws to hold a clamp in place, and then loosen the jaws when you want to remove the clamp from the holder. This website uses first party and third party cookies to improve your experience and anonymously track site visits. Touch device users, explore by touch or with swipe gestures. By Tom Caspar Clamp Warehouse Hang your long, heavy clamps on this rack designed for strength. clamp plans rack pipe wood racks storage woodworking build diy space mobile carts savers clamps step tool building easy projects Etsys 100% renewable electricity commitment includes the electricity used by the data centers that host Etsy.com, the Sell on Etsy app, and the Etsy app, as well as the electricity that powers Etsys global offices and employees working remotely from home in the US. This is seriously the nicest miter saw Ive owned yet! Copyright var d = new Date(); var y = d.getFullYear(); document.write(y);. Please.
Seller will cover return shipping costs.
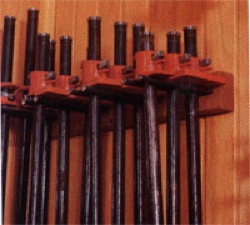
If you go with the handles in front design, you can still place them bar side out any time you want. First, determinethe thickness of the bar (or pipe) of your clamps. Miter the ends of the braces , Build Clamp Rack - Workshop Solutions Projects, Tips and Tricks| WoodArchivist.com, Clamp Rack Plans - Workshop Solutions Projects, Tips and Tricks | WoodArchivist.com. Make sure you havea nice, squareedge across the front and the left side. You'll see now that you don't really care how much wood is in between the slots; the only thing you need to be concerned with the the distance between the centers of each slot, Measurement B. #diywoodwork, Learn how to build a french cleat wall for a few different versions of the clamp racks. Sand he faces and edges smooth, then set these pieces aside. Captcha failed to load. This creates a single point where you'll drill your hole to start the slot. And I think of that as more of a clamp hanging spotthan a proper organization system. When the job calls for plenty of clamping pressure, no-nonsense C-clamps provide the answer. A crosscut sled or a miter gauge with a long auxiliary fence will make this a quick job. If youd like to file an allegation of infringement, youll need to follow the process described in our Copyright and Intellectual Property Policy. With only basic woodworking skills, a tablesaw, and a few simple tools, you can make custom cabinets for your home or shop. A simple Google search renders a ton of clamp rack storage solutions, but I wanted quick, easy, and free. Because of the nature of these items, unless they arrive damaged or defective, I can't accept returns for: Etsy keeps your payment information secure. Theres nothing more frustrating than being in the middle of a glue-up only to discover you need just one more clamp to finish the job. The handling is super smooth and the cuts are precise. Copyright 2022 Meredith Corporation. Theres an oldand very trueadage that says you can never have too many clamps. Then glue the second Post to the first, clamp it in place, and secure it to the Back, as well. Cut three Backs to length from a 1x8 board, as shown in the cutting diagram. As a part of the Program, I am receiving compensation in the form of products and services, for the purpose of promoting The Home Depot. Pittsburgh-based custom wood and metal worker. Heres a classic project that both steps up and provides overflow seating. If you had to recommend three, which hand planes should I start with? Click Here to download a PDF of the related drawings. Attach the sides to the inside of the rack with more screws. Joining end grain to long grain forms the king of joints. |.  A backboard with protruding dowels does the job for supporting 4", 6", and 9"-long spring clamps. If youre looking for a full plan, check that out here: ADJUSTABLE CLAMP RACK PLAN! Want to see more workshop projects?
By visiting this website, you opt-in to the use of cookies. The fastest cut was the miter saw for me. For more detailed instructions check out the full plan! Pine board , 1x8 x 48", Pine board , 1x4 x 48", Pine board , 1x3 x 96", Pine board , 1x2 x 24", Pine board , 1/2"x6 x 36", Back , 3/4" x 7 1/4 " x 15", Shelf , 3/4" x 2 1/2 " x 15", Post , 3/4" x 2 1/2" x 10", Cleat , 1/2" x 5 1/2" x 2 1/4", Cleat Spacer , 3/4" x 1 1/2" x 5 1/2", Rail , 3/4" 3 1/2" x 48", Rail Spacer , 3/4" x 2 1/2 " x 3". In this video, I show you how to make an adjustable clamp rack for your workshop thats designed to hold and organize every style of clamp you may keep in your workshop. homemadetools lumberjocks issues interesthing holzbearbeitung (I didnt fuss with wood finish on my racks, but it couldnt hurt. Your email address will not be published. Finally, I located a stud in the wall and hung my DIY clamp rack up. This post contains affiliate links. Plus, if you already know about that trick, you certainly don't need me to give you a how-to. People often ask me what tools to buy when youre first getting into woodworking and I always say to invest in a great table saw and miter saw. Then secure the Rail assembly to the wall by driving two 3 1/2" flat-head wood screws into each stud. this link is to an external site that may or may not meet accessibility guidelines. Now, load them up with clamps! SmalltimeWoodCraft The notches allow you to hang the clamps on the rack without having to tighten them. If you're hanging heavy pipe clamps, you may want to counterbore and use some lag bolts to get into the studs to support the extra weight.
Price and other details may vary based on product size and color. If you're interested, check out the tutorial for the parallel jaw clamp storage system I made. Your sides could be squares, triangles, or French curves; whateveryou want. Check out these mysterious cave drawings on these scrap wood pieces!
No more messy piles, or digging through drawers.This project is also a good chance to practice some basic joinery such as Dados and Dovetails.Please note, for the sake of brevity the instructions do assume some familiarity with hand tools!Include with this purchase:-Instructions (pdf)-link to video tutorial-3D sketch up files-Cut-sheet(You'll need a PDF reader, an UnZip utility, and the Sketchup program to make full use of these.). This DIY Parallel Clamp Rack fits the bill I made it out of scraps (free!) But please contact me if you have any problems with your order. You can clamp them in, placing the rack between both jaws, put them handle side first and just let them hang, or rest them on the bottom jaw, as above. woodarchivist
It can seem intimidating, but it is not as daunting as it may seem. To read my full disclosure policy, please clickhere. So if youre in the market for an awesome miter saw and are able/willing to invest in one, this is the one Id recommend. So, handles in front/longer slot is the most versatile option.
The front support with its numerous slots holds the clamps upright and keeps them from dinging the wall. Yes! Here, my Bessey clamp bars are 5/16 thick, so I'll choose 3/8 for my slot size. You could also lengthen the two parts, and cut the number of slots needed to match your supply of clamps. Then, set each rack on its wall cleat.
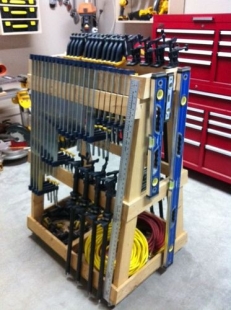
This build has a lot of steps. You've already signed up for some newsletters, but you haven't confirmed your address. Over time, Ive come to collect a large variety of woodworking clamps in my shop. document.getElementById( "ak_js_1" ).setAttribute( "value", ( new Date() ).getTime() ); Have You Completed a Jen Woodhouse DIY Project? Isn't the easiest way to hold clamps just some 2x4sbolted to the walls, and maybe someholesand plumbingpipe inserted to hang the clamps on? Yeah, perhaps. Rustic Wall Mounted Coat Rack with Shelves. in just a few hours (quick and easy!) Fasten a pair of spacers to the bottom outside edges of each back panel to complete the building stage. Q: How many clamps does a woodworker need? The two remaining full-length strips are dedicated to the angled braces. With the back attached, create the sides. Join the movement & punch your next project in the face. Keep your favorite wines, stemware, and serving accessories handy in this stylish unit. I used 2 countersunk deck screws and glue for assembling all of these parts. Mount a 38 " dado blade to your tablesaw, and raise the blade 2" above the saw table. These clamp racks will be very heavy once fully loaded. Its a new addition to the shop and I am LOVING IT SO MUCH. clamp rack screw diy coat hand hardware hooks tools storage 6. These compact but capacious racks will keep your clamps orderly, and all you need is one 4 x 8 sheet of plywood to make them both. A functioning clamp rack. Your recently viewed items and featured recommendations, Select the department you want to search in, Ladder Rack Clamps Truck Cap Topper Clamp, MOTAFAR 4 PCS Mounting Clamps Ladder Rack Clamps Truck Cap Topper Camper Shell Heavy Duty for Chevy Silverado Sierra 1500/2500/3500; Dodge, Ram 1500/2500/3500, F150 F250, Mitsubishi, Toyota(Black), MOTAFAR 6 PCS Mounting Clamps Ladder Rack Clamps Truck Cap Topper Camper Shell Heavy Duty for Chevy Silverado Sierra 1500/2500/3500; Dodge, Ram 1500/2500/3500, F150 F250, Mitsubishi, Toyota(Black), MOTAFAR 8 PCS Mounting Clamps Ladder Rack Clamps Truck Cap Topper Camper Shell Heavy Duty for Chevy Silverado Sierra 1500/2500/3500; Dodge, Ram 1500/2500/3500, F150 F250, Mitsubishi, Toyota(Black).
(#namethatmovie). Bar-clamp rack3. My clamp wall is almost complete.
To make the slots, cut the horizontal support to shape, rout 38 " round-overs along the edges and corners, and mark the notches 158 " on center. You can download the original design here. This is great when you're using them frequently, but don't want them to clutter up your workbench. NOTE: At this point, you can decide whether you want to store your clamps handles in front or handles in the back. Mine is 4 1/4 wide. Cut three Rail Spacers to length as shown in the cutting diagram. Let Mother Nature be your co-designer as you build dazzling projects with wavy edges, bristly burrs, bark inclusions, and other flaws that give wood a look of unrefined beauty.
Once its on the wall, you can see the number of ways you can place the clamps in the rack. Also, be sure to check out some of my other shop builds: Want to try this build out for yourself? Assemble the clamp hangers by attaching the hanger blocks to the back mount. Set up your Kreg Pocket-Hole Jig for 3/4" material, and then drill pocket holes in each Post and Shelf, as shown. Looks like you already have an account! Oh yeah, you read that right. Instead, I present this clamp rack design: infinitely adaptable to any scale, and able to hold almost any type of clamp. If the item is not returned in its original condition, the buyer is responsible for any loss in value. Difficult?
You could easily make it the same size as the top. Find your wall studs, or use appropriate anchors, to hang the clamp rack up, screwing through the back. Glue and clamp the Cleat assembly to the Back at the location shown.  clamp rack storage plans racks clamps slots rims areas surface edge pieces offer extra deep around shotgun approach plywood sheet
  Clamp Rack - neat idea for storing clamps. If you've got quite a collection, extend the board or make two or more holders as needed. Three great finishes (that aren't polyurethane). If you want the added protection, finish the parts before beginning the assembly process, while the part faces are fully accessible.). Then glue and clamp each Spacer to the back of each Cleat, as shown. Here's how. To hang and organize this type of clamp, build our four-piece wall-mounted hanger with its notched front support.
The clamps are up and out of the way, organized, and easily accessible whenever I need them. The braces form a 45-degree triangle with the two arms. If you have any excess wood in the front or back, cut it off now to determine your overall length. Have a screwdriver with a long handle as well as a 12-point socket. Using 1 1/2 T-bolts and small knobs, attach the hangers and tighten before adding clamps.
Next, cut the back of the rack. This is Measurement C. Begin with an oversize piece of 3/4 plywood. For more information on my Affiliate disclosure, check out my Disclosure Page. Use a square to extend the sides of these holes to the front of the work. Gravity helps keep them in place. When this happens, we turn to our locking C-clamps, the largest of which has a throat depth of over 15". On this build, I only used 1 sheet of plywood and some hardware, making it a really affordable project to tackle for yourself. Once those are done, cut to size the six bridges that will span each pair of braces, and make the four end pieces with one corner of each rounded to a 1 radius. Unfinished garage becomes a woodworking haven.
*I acknowledge thatThe Home Depotis partnering with me to participate in the ProSpective 2019 Campaign.
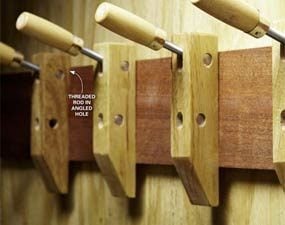
Mount a wood extension to your miter gauge, and make the cuts where marked. I am a self-taught carpenter with a fearless DIY spirit and a penchant for problem-solving. How to Backup a TrailerIts Easier Than You Think. Just cut the support extension (A) to fit between the threaded rods of the clamp, chamfer the outside end of the support, and securely mount it to the backboard (B). Youre seeing this ad based on the products relevance to your search query. Plan saved successfully to your account. Next on the To Do list: build another clamp rack for my F-style, spring, pipe, and C-clamps.
Cut both pairs of these cleats to size, and tilt your table saw blade to bevel-rip their angled edges. Glue and screw the Shelves to two of the Backs in the configurations shown using 1 1/4" coarse-thread Kreg Pocket-Hole Screws. I think I need to make something like this to organise them! But with this Wall Mounted Clamp Rack - Downloadable Plan, Lumber & Sheet Goods Storage Rack - Downloadable Plan, Woodworking Project Paper Plan to Build Five Great Clamp Organizers, Woodworking Project Paper Plan to Build Wall-Mounted Clamp Rack, Crosscut Station / Lumber Rack - Downloadable Plan, Woodworking Project Paper Plan to Build Lumber Storage Rack, Woodworking Project Paper Plan to Build Clamp Rack, Full Service Mitersaw Stand - Downloadable Plan, Dead On Accurate Cross Cut Sled - Downloadable Plan. Best of all, Ive included adjustable wood clamp rack plans for you to purchase for just five dollars to make it a little easier to follow. Next up: a way to store my wooden hand screws. Add optional spacer blocks or use your mounting method of choice for the back of the mounting plate. My post complies with the Word Of Mouth Marketing Association (WOMMA) Ethics Code and applicable Federal Trade Commission guidelines. But please contact me if you have any problems with your order. But with this mobile A-frame rack, you can stop the madness and keep everything within arm's reach. I cut off 2 to make everything uniform. This will sit under the top slotted shelf you just created, and you'll screw through it to secure the wood to the wall. We take intellectual property concerns very seriously, but many of these problems can be resolved directly by the parties involved. Glue and screw the first Post to a Back where shown using 1 1/4" coarse-thread Kreg Pocket-Hole Screws. I just held up the piece to the sides of the clamp rack and traced my marks, then cut it out on the band saw. Note that the top back edge of the bridges will overhang the backs of the braces by 1-12. Attach the top to the back using screws. Hands down.
I used to be an offensive lineman in the NFL, Now I run my own furniture business and am completely self taught. Plywood is important here becausethe grain of the plysrun in opposite directions, so it's strong across both its length and its width, and won't snap along a grain line with the thin tongues cut between the slots. You can use a table saw, track saw, or circular saw to make these cuts. Begin with 8 wide rips for the hangers, then move up the sheet.